Tuesday, 28 December 2010

[TUT] Install Windows 7/Vista From USB Drive

This guide works 100% for Vista & Windows 7 unlike most of the guides out there. I have seen many sites/blogs that have “Install Vista from USB guide” but either with incomplete steps or not working guide. I have also seen some guides that don’t’ use proper commands in this guide. After spending many hours I have come up with this 100% working guide.
I just did this method on one of my friends machine and installed the new Windows 7 BETA. The main advantage is that by using USB drive you will be able to install Windows 7/Vista in just 15 minutes. You can also use this bootable USB drive on friend’s computer who doesn’t have a DVD optical drive.
The method is very simple and you can use without any hassles. Needless to say that your motherboard should support USB Boot feature to make use of the bootable USB drive.
Requirements:
*USB Flash Drive (Minimum 4GB)
*Windows 7 or Vista installation files.
Follow the below steps to create bootable Windows 7/Vista USB drive using which you can install Windows 7/Vista easily.
1. Plug-in your USB flash drive to USB port and move all the contents from USB drive to a safe location on your system.
2. Open Command Prompt with admin rights. Use any of the below methods to open Command Prompt with admin rights.
*Type cmd in Start menu search box and hit Ctrl+ Shift+ Enter.
Or
*Go to Start menu > All programs > Accessories, right click on Command Prompt and select Run as administrator.
3. You need to know about the USB drive a little bit. Type in the following commands in the command prompt:
First type DISKPART and hit enter to see the below message.

Next type LIST DISK command and note down the Disk number (ex: Disk 1) of your USB flash drive. In the below screenshot my Flash Drive Disk no is Disk 1.
4. Next type all the below commands one by one. Here I assume that your disk drive no is “Disk 1”.If you have Disk 2 as your USB flash drive then use Disk 2.Refer the above step to confirm it.
So below are the commands you need to type and execute one by one:
SELECT DISK 1
CLEAN
CREATE PARTITION PRIMARY
SELECT PARTITION 1
ACTIVE
FORMAT FS=NTFS QUICK
(Format process may take few seconds)
ASSIGN
EXIT
Don’t close the command prompt as we need to execute one more command at the next step. Just minimize it.

5. Next insert your Windows7/Vista DVD into the optical drive and check the drive letter of the DVD drive. In this guide I will assume that your DVD drive letter is “D” and USB drive letter is “H” (open my computer to know about it).
6. Maximize the minimized Command Prompt in the 4th step.Type the following command now:
D: CD BOOT and hit enter.Where “D” is your DVD drive letter.
CD BOOT and hit enter to see the below message.
7. Type another command given below to update the USB drive with BOOTMGR compatible code.
BOOTSECT.EXE /NT60 H:

Where “H” is your USB drive letter. Once you enter the above command you will see the below message.
8. Copy your Windows 7/Vista DVD contents to the USB flash drive.
9. Your USB drive is ready to boot and install Windows 7/Vista. Only thing you need to change the boot priority at the BIOS to USB from the HDD or CD ROM drive. I won’t explain it as it’s just the matter the changing the boot priority or enabling the USB boot option in the BIOS.
Note: If you are not able to boot after following this guide means you haven’t set the BIOS priority to USB. If you got any problem in following this guide feel free to ask questions by leaving comment.

Monday, 31 May 2010

Babylon


Babylon Pro v8.1.0 r19
https://mega.co.nz/#!pcIUUZTb!OAXPZyCYSDAvqpd00eV4DieD86A6j_bCMz4EtuCsEYA
https://docs.google.com/file/d/0B4vg7Usn7Pa5YlZoLW4wN2RiMms/edit?usp=sharing

Dictionary  
https://docs.google.com/file/d/0B4vg7Usn7Pa5NjROMmtzdGxnZ3M/edit?usp=sharing
https://mega.co.nz/#!UMgihLpC!Qso-Iw7TY2a-UaKwm8SYGXxQ_tVT1YPAntIvL7smOBI

Use Babylon in Adobe reader:
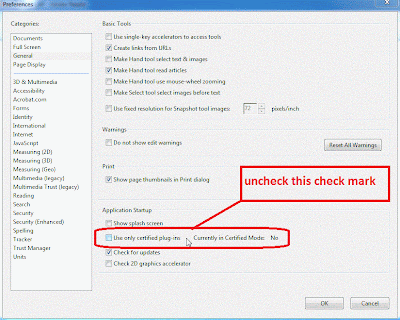
Open Adobe Reader: edit=>perferenve=>general
uncheck this check mark : use only certified plug-in. like this:

then goto this directory: .....\Babylon-Pro\Utils copy BabylonRPI.api
and paste in : ......Adobe\Reader 8.0\Reader\plug_ins
close and re-open both babylon and acrobat
and enjoy both


Sunday, 30 May 2010

K-Lite Codec Park

K-Lite.Mega.Codec.Pack.5.4.4
homepapes

Wednesday, 26 May 2010

Windows XP Crack

Windows Genuine Advantage
(WGA) v1.9.40.0 Cracked V5 x86

Sunday, 23 May 2010

Driver Genius

Driver Genius Pro v.9.0.0.190


Saturday, 22 May 2010

[MF] FESOUP

FESOUP|MultiFunctional Tool Version 3.4.1.4 Beta


Thursday, 14 January 2010

[TUT] X264 Encoding

* X264 Encoding Tutorial from HD Source
o 1. Demux (extract video, audio)
Purpose: extract video and audio separately then we can work out on each at ease.
Software: MKVtoolnix +MkvetractGUI
Procedure:
+ Start MkvextractGUI
+ At Input, browse for the source file
+ Wait for loading, and then at the content box, check all of the content
+ Click Extract to start
+ After about 5’ , done!

o 2. Encode audio
Software: Foobar2000 + foo_ac3.dll + NeroAacenc.exe
Procedure:
+ Copy foo_ac3.dll to your component directory of Foobar2000
+ Start Foobar2000
+ Add your source audio file that you has just extracted.
+ Right click on it and looking for Convert Convert to the same folder
+ A dialog appeared asking for the encoding option
+ In the dropdown menu, select MP4(Nero), then click … to select the bitrate
+ Select Mode: ABR and quality of 192kbps or higher if you need better quality then OK 2 times
+ If the transcode warning showed up, just click yes
+ If it asks for the neroaacenc.exe, browse to that file on your hard drive then click ok
+ The transcoding takes about 5-10 minutes depend on your system and the length of you audio file

o 3. Encode Video
Software: meGui + Avisynth
Procedure:
+ Start meGUI
+ Go to Tools  Avisynth script creator
+ In the new window, browse to your video file that you extracted off from Task 1
+ A window preview of your video will appeared then.
+ If you see a black border, click on Autocrop to crop it, this will help saving the bitrate for the content
+ In the resize option, it depend on your needs, here I do m-HD then I resize to 720x480 (for 16/9 AR of source file)
# The resize option that from hdtv-fan's x264, mkv help thread for anamorphic m-HD
1280x720 => 720x480
1280x528 => 720x352
1280x544 => 720x(~)362
1280x688 => 720x(~)458
+ Make sure you check “On Save close and load to be encoded”
+ Save avs file and it will be automatically load on in your Video input
+ Select Codec x264, file format mkv
+ Select the profile, here I recommend HQ-Slower for better quality still it takes a bit long time to encode.
+ Go to config, in the tab Zones, type “--sar 40:33” in Custom command line Options. This option is for anamorphic encoding
+ Next, go to Tools  Bitrate calculator to get the extract bitrate so that the file size is as your need.
+ At Audio section, select the audio file that you already encoded in taks 2 (format of mp4)
+ In total size, input your desire file size of your movie after encoding, then the result bitrate will be calculated and showed in the below section.
+ Click apply to finish Bitrate calculator
+ Click enqueue to get your file ready to be encoded.
+ Now you almost get to the point but don’t start if you want to do a batch encode. Follow all the same instructions before to your another video files and click enqueue when you done with each
+ When you finish with configuration all your files, now click on tab Queue to start the job
+ Click start, if it asks something for a worker, type anything and Ok
+ Now, go to sleep or go watching movie while your PC does its jobs.
+ The average time is about 5-6 hours of 1 hour HD video if you have a fast CPU. Maybe damn slower if your CPU suck :P. Be patient, then you can have the best quality.

o 4. Mux
Purpose: to multiplex your encoded audio and video and even subtitle to only 1 file ( container)
Tools: MKVtoolnix
Procedure:
+ Start Mkvmerge GUI
+ Add the encoded video, audio and subtitles of your movies
+ In the track box, edit information if you want or you can leave it as
+ At Output file name, put a name for your new movie file. Be sure that the name not the same with the encoded video file , otherwise it will overwrite while you still need that file to multiplex. Such a disaster!!!

mkvtoolnix

http://www.bunkus.org/videotools/mkvtoolnix/downloads.html#windows

Foobar2000 + foo_ac3.dll + NeroAacenc.exe

http://www.foobar2000.org/download.html

http://kode54.foobar2000.org/foo_ac3.zip

http://www.nero.com/eng/down-ndaudio.php

meGui

http://www.sf.net/projects/megui

MkvExtractGUI

http://www.videohelp.com/tools/MKVExtractGUI

Avisynth

http://sourceforge.net/projects/avisynth2/files/

K-Lite Codec Pack 64-bit
http://www.codecguide.com/klcp_64bit.htm

Saturday, 2 January 2010

Joining multiple .001 files

Batch joining multiple .001 files
 

I just use hjjoin http://www.freebyte.com/download/hj-join.zip
Run join32 in the same directory as all your .001 files and it should automatically join them. Works good for me. :)